Livestream to third parties
Covers the best practices and instruction to stream out to third parties streaming platforms such as social media platforms
- Getting started
- How to work with third parties live streaming platforms
- LinkedIn Live
- Youtube Live
- X / Twitter
- Facebook Live
- Tiktok
- Twitch
- Teams Live Event
- Teams Town hall
- Overview of Microsoft Teams Event Types
- Event Engine State API
- Embedded Player Customization
Getting started
If you require our operators to stream out to your, or partners, accounts on external platforms (i.e., Facebook, Youtube, Linkedin, Instagram, etc.) We will need to exchange confidential information.
If your project includes many output destinations, and many sources (i.e., different source for each output) the project complexity will increase and the management on both ends can be time consuming and source of errors.
Please read this article and the related ones to get familiar with our processes.
In general, to preserve security and confidentiality best practices, Brainsonic Live recommands its client to not communicate any credentials to outside the organization, even to Brainsonic Live.
To avoid useless complexity we ask organizers to fill and use our template for simulive and thrid parties streaming projects. It's available in Microsoft Excel format.
Depending on the third party (social media platform) we would prefer organizer:
- To add a Brainsonic Live account as content administrator to your account or page
- To share the streaming destination values (i.e., stream key) with Brainsonic Live
However in some cases it can be necessary for Brainsonic to get those credentials.
Those scenarios are:
- Organizer wants Brainsonic Live to create and manage the live event using the third party application
- The third party platform does not provide a appropriate way to delegate live event management to another account
- Getting the streaming destination values requieres a complex workflow
Related articles
How to work with third parties live streaming platforms
LinkedIn Live
There is two ways to stream out to your LinkedIn page:
In any scenario, your page needs to meet the LinkedIn Live access criteria.
Please refer to the official LinkedIn Live access criteria documentation.
Be aware that this enablement can take time.
Regardless of who is streaming, Linkedin has a maximum of 4 hours for each stream.
1. You create a LinkedIn Live event on your own
You login into your account, schedule and create your event and send us Stream Key
Please refer to the official LinkedIn Live documentation
- You need a Linkedin Page with >150 subscribers
- Once you are eligible go there https://www.linkedin.com/video/golive/now/
- Setup your event as you which on the left pane
- Then on the bottom pane, Stream settings tab, select the region Europe, West where Brainsonic Streaming Infrastructure is originating its streams
- Click on Get URL button
- Copy and send Stream URL and Stream Key to you Brainsonic representative
- When the stream will start to be pushed you will be able to watch it from the Live control center. Once ready you just have to press the Go live button.
Once done, the page you are acting on behalf of, will post the live stream directly on the feed.
2. Our operators act on your behalf
Do not communicate your password under any circumstances.
And we need the following items:
- A title (75 car.)
- Description (5000 car.)
If scheduled : - Date, time and timezone
- Preview image (1920x1080 - <2MB)
Youtube Live
There is two ways to stream out to your Youtube channel:
In any scenario, your channel needs to request access to live streaming.
Open the Youtube Creator Studio then request the activation.
Be aware that this enablement take up to 24 hours.
Youtube has no limit of time for the live stream. However, there will be no recording if it lasts more than 12h so we advise you to stay under this limit.
1. Our operators act on your behalf
Do not communicate your password under any circumstances.
And we need the following items:
- A title (Mandatory -100 car.)
- A description (5000 car.)
- A category
- Date, time and timezone
- Preview image (1280x720 - <2MB - JPEG/PNG/GIF)
- A type of audience/ age limit
2. You create a Youtube Live event on your own
You login into your account, schedule and create your event and send us Stream Key
Please refer to the official Youtube Live documentation
- Once you are eligible go there https://studio.youtube.com/channel/UC/livestreaming
- Choose between schedule an event and immediate start of a show at the question When do you want to go live?
- At the step Pick the type of stream to begin select Streaming software
- Under Stream settings > Stream key > Select stream key dropdown, select "Brainsonic Live" or Create a new stream key if it doesn't exists
- Name the new key "Brainsonic Live", select RTMP as streaming protocol then CREATE
- Once back on the Studio interface, make sure that the newly created Stream Key is selected, then copy the Stream Key and send it to your Brainsonic representative.
- If you are not planning any interaction between the audience and the content streamed (i.e. pre-recorded material), choose Normal latency as Stream Latency
- The livestream will start once the Brainsonic Streaming Infrastructure will start streaming. Despite wanting to start as late as possible we recommend starting streaming way before show start (i.e., 20min) to avoid any issue and take no chance to miss the live show start. Alternatively you may want to create a scheduled event and then be able to go live by pressing a button.
To access or launch a scheduled live stream, go to the Live Control room and select Manage
X / Twitter
There is two ways for to stream out to your Twitter account:
In any scenario, you need a Twitter account with Media Studio enabled by a Twitter representative
Please refer to the official Twitter Media Studio enablement documentation.
Be aware that this enablement can take a few days.
1. You create a Twitter live broadcast on your own
You login into your account, schedule and create your event and send us Stream Key
Please refer to the official Twitter Media Studio documentation
- You need a Twitter account with Media Studio enabled
- Once you are eligible go there https://studio.twitter.com/producer/broadcasts
- On the Live tab, click Create Broadcast
- Enter the information that qualifies your event
- On the Source section, select Create a new source, then name it Brainsonic Live
- Select the EU (Paris) region as well as the RTMP Source type, then Done
- Copy Source URL and Stream key values then send them to your Brainsonic representative
- You can define if you want to start now or later.
- When the stream will start to be pushed you will be able to watch it from the Live control center. Once ready you just have to press the Go Live button.
2. Our operators act on your behalf
Do not communicate your password under any circumstances.
And we need the following items:
- A title (same constraint than a tweet, 280 car.)
- Pick a categorie
- Tweet content
If scheduled : - Date, time and timezone
- Preview image (16:9 ratio, PNG)
See list of available categories
Automotive (Cars, Trucks, Racing)
Comedy
Digital Creators
Entertainment & Pop Culture
Esports & Video Games
Financial & Business News
Food & Drink
Lifestyle (Fashion, Travel, Wellness)
Music
News & Current Events
Politics
Science & Education
Sports
Technology
Television
Facebook Live
There is two ways for to stream out to your Facebook page:
1. You create a Facebook Live event on your own
You login into your account, schedule and create your event and send us Stream Key
Please refer to the official Facebook Live documentation
- On the New Post box, clik on Live Video
- Select Go Live (you could also select Live Event to create a Facebook Event)
- Add the Title
- Select Streaming Software under Select a video source
- Enable Backup stream toggle
- Copy the Streaming Key that just shown up (it should look like
FB10159995604943449-0-Abz68JtzS__fskdfbe) - Send it to your Brainsonic representative
- The livestream will start once you receive feed from Brainsonic and click . Despite wanting to start as late as possible we recommend starting streaming way before show start (i.e., 20min) to avoid any issue and take no chance to miss the live show start.
2. Our operators act on your behalf
Do not communicate your password under any circumstances.
And we need the following items:
- A title
- A description
- Date, time and timezone
- Preview image (16:9 ratio, PNG)
Prerequisite
Your IG account need to be eligible to IG Live Producer. Please contact your Brainsonic Live representative to obtain such an access.
We do not use nor promote the usage of applications such as Instafeed or Promovgram.
These providers are offering an integrated Web solution to get Instagram stream key from a mobile device emulator.
However this solution not being officially supported by Meta, and those services being hosted outside of EU. We cannot expose our clients to potential credentials leaks.
It is not possible to disable comments on an IG Live video that was initiated though IG Live Producer. Therefore IG proposed a few options, see below.
1. You create an Instagram Live event on your own
You login into your account, schedule and create your event and send us Stream Key
Please refer to the official Instagram Live Producer documentation
- Login on instagram.com.
- From le left menu clic on Create > Live video
- Set title and audience
- Communicate the stream key (should look like
18180500569288623?s_bl=1&s_fbp=fra3-1&s_prp=cdg4-3&s_sw=0&s_tids=1&s_vt=ig&a=Abyn4PLX7HRFZY1F) - Brainsonic will start streaming.
- Clic on Go Live. Despite wanting to start as late as possible we recommend starting streaming way before show start (i.e., 5-10min) to avoid any issue and take no chance to miss the live show start.
2. Our operators act on your behalf
If you choose to communicate your credentials (which is not recommended - you can still change it before the live and change it for the old one after the live) make sure that you are able to
- Provide a username and a password to your Brainsonic representative
- Provide a direct communication channel between the Brainsonic operator and the person supposed to provide the 2FA temporary code.
- This person will be asked to provide a 2FA code when the Brainsonic operator try to login to the platform to start pushing the livestream
- We strongly recommend to perform a test of all this chain including the direct communication channel, >24h before the live show.
We need the following items:
- A title
- A comments setting
Handling comments
This is the only way a partner can theoretically “disable” comments on a live on Instagram Live Producer as no true option is available. This allows only pages you follow to comment which gives a bit of control. You can effectively unfollow people and then follow them back once the live is over. However, choosing this option will restrict comments on the entire account (will apply to comments on live broadcasts, reels, stories and posts).
- Click More
- Click Settings
- Click Privacy & Security
- Click Edit comment settings
- Click People You Follow.
Tiktok
Principle
You login into your account and send us Stream Key
Steps
- You need a Tiktok account with >1000 followers (to keep the live access, you need do stream regularly)
- Once you are eligible go there https://livecenter.tiktok.com/producer

- Click "Go LIVE" when your event is set up

- Copy the Server URL and Stream key and send them to your Brainsonic representative


Live functionnality access
We might need your account UID to assist getting live capabilities enablement.
Note that we have to contact Tiktok for this so it might take some time.
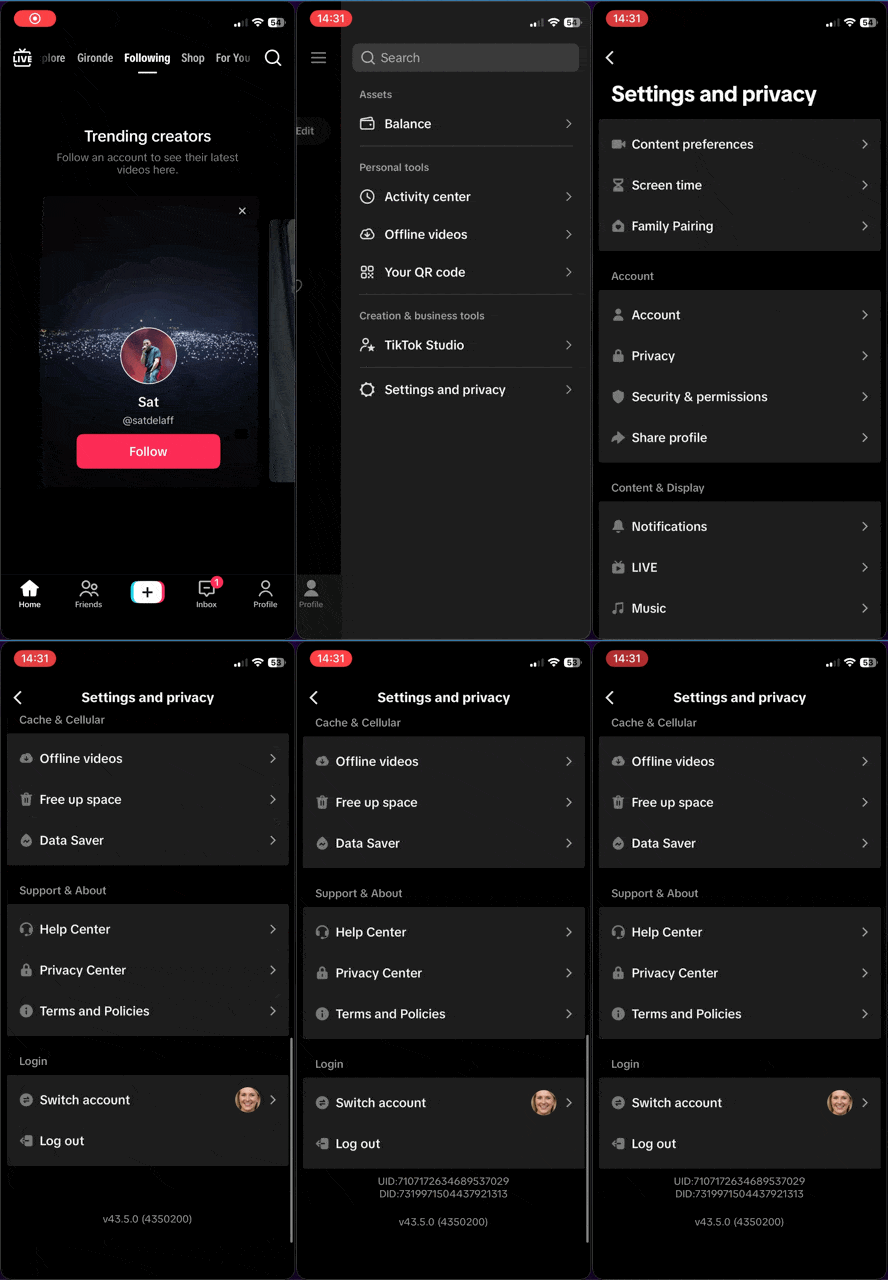
UID can be obtained from the TikTok mobile application
- Install and login on TikTok app
- Go to Profil from the bottom menu
- Click on the three lines icon on the top right then on Settings and Privacy
- Scroll down to the bottom of the menu
- Click multiple times on the version number
- Get the UID
Going live
The livestream will start once the Brainsonic Streaming Infrastructure will start streaming. Despite wanting to start as late as possible we recommend starting streaming way before show start (i.e., 5-10min) to avoid any issue and take no chance to miss the live show start.
Twitch
Principle
You login into your account and allow us to stream on your behalf
Steps
- Once you are logged in go there https://dashboard.twitch.tv/settings/stream
- Scroll down to authorisations and click on "People allowed to stream on your channel"
- Add our email : camille.faussaire@brainsonic.com.
- We will receive a stream key dedicated to us on your channel (so we don't have access to your stream key)
Going live
The livestream will start once the Brainsonic Streaming Infrastructure will start streaming. Despite wanting to start as late as possible we recommend starting streaming way before show start (i.e., 10min) to avoid any issue and take no chance to miss the live show start.
Check stream settings
Twitch does not provide the ability to preview the stream before going live. You can still perform a test that won't be visible on the channel by adding ?bandwidthtest=true at the end of the stream key when you paste it on your streaming software.
Once ready to perform a test, account owner needs to login to https://inspector.twitch.tv/

Information about stream health will be visible during the test.
Teams Live Event
Disclaimer : when this documentation is written, there is a new display appearing is teams calendar. However, the new display doesn't show options to create live events at the moment so this documentation require to use the older dipslay by making sure that the option "New Calendar" is unchecked at the top right corner of teams' window.
Create a live event
Creation
In order to create a Teams Live Event, you need to unfold the menu on the "New meeting" button (1) then select Live Event (2).

Settings
Once you've clicked on Live Event, a new window pop up for the configuration.
There, you can set the title (1) as well as the details of your event. In order to allow us to join your event, you will need to check "Allow external presenters" (2) and add our email address (3). Once this is done, the new presenter will be displayed bellow the organizer. Click on it to change it's role to producer (4). You can then click "next"

This part can be updated after the event creation by opening on it from the calendar.
In the next windows, you can change some other settings according to your need. Make sure that "Teams Encoder" is checked on the "How will you produce" section.

We also recommend to uncheck "Recording available to attendees" as we will provide you a version of better quality after the live.
Once you're ready to go, you can click on schedule to finish the creation.
This part can also be updated after the event creation by opening the event on the calendar the by clicking on "Settings".
Teams Town hall
Disclaimer : when this documentation is written, there is a new display appearing is teams calendar. However, the new display doesn't show options to create town hall at the moment so this documentation require to use the older dipslay by making sure that the option "New Calendar" is unchecked at the top right corner of teams' window.
Create a town hall
Creation
In order to create a Teams Town hall, you need to unfold the menu on the "New meeting" button (1) then select Town hall (2).

Settings
Once you've clicked on Town hall, a new window pop up for the configuration.
There, you can set the title (1) as well as the details of your event. In order to allow us to join your event, add our email address (2) as co-organizer. The new presenter will be displayed below the organizer. Once you're done with your own settings, click on "Meeting options" (3) to continue.

In the new window, under the "Production tools" menu (1), enable "RTMP-in" (2). You can do your other configurations then click on "apply" and then, back on the previous window, click on "Save and send invites".

You can now finish your configuration and click on publish on the top right corner to finish and get your attendees link.

You can modify your settings after the creation by double-clicking on the event in the calendar then clicking on "Manage event"
Overview of Microsoft Teams Event Types
This page summarizes the different Microsoft Teams event types, their participant capacity, and whether each one supports live human language interpretation. Use it as a quick reference when planning a multilingual or large-scale event.
Microsoft Teams offers several event formats, each designed for a specific use case. Choosing the right one depends mainly on three criteria: the expected audience size, the level of interaction needed, and whether live human interpretation is required.
The four main formats are Meetings, Webinars, Town halls and (the now deprecated) Live events.
Participant capacity and live interpretation
The table below summarizes the maximum number of participants and the availability of live human interpretation channels for each Teams event type.
| Event type | Interactive participants | View-only mode | Max total | Live human interpretation |
|---|---|---|---|---|
| Standard meeting | 1,000 | Up to 10,000 additional | 11,000 | ✅ Yes (up to 1,000 participants) |
| Webinar | 1,000 | — | 1,000 | ✅ Yes |
| Town hall (standard) | Presenters only | 10,000 | 10,000 | ❌ No |
| Town hall (Teams Premium) | Presenters only | 20,000 – 50,000 | 20,000 – 50,000 | ❌ No |
| Town hall (LEAP assistance) | Presenters only | Up to 100,000 | 100,000 | ❌ No |
| Live events (deprecated) | Presenters only | 10,000 (temporarily 20,000) | 10,000 – 20,000 | ❌ No |
| Meet now / ad-hoc / 1:1 call | — | — | — | ❌ No |
| End-to-end encrypted (E2EE) meeting | — | — | — | ❌ No |
Microsoft is gradually phasing out Live events in favor of Town halls. We recommend planning new broadcast-style events as Town halls.
Details by event type
Standard meeting
Standard Teams meetings can host up to 11,000 participants in total: the first 1,000 attendees can fully interact (audio, video, screen sharing, chat), and any additional attendees — up to 10,000 more — join in view-only mode.
When a meeting reaches 1,000 attendees, the meeting organizer and presenters will see a banner indicating that new attendees will join as view-only.
Breakout rooms can only be created in meetings with fewer than 300 attendees. Creating breakout rooms automatically caps the meeting at 300 attendees.
Webinar
Webinars are structured events with clear presenter and attendee roles. They support up to 1,000 attendees and include registration management, a customizable event and registration site, and event-oriented default meeting options.
Town hall
Town halls are designed for one-to-many broadcast scenarios. Attendees can watch presenters and participate through Q&A, but their cameras and microphones stay off.
- Standard licenses: up to 10,000 attendees
- Teams Premium: up to 20,000 – 50,000 attendees (depending on attendee capacity packs)
- LEAP (Live Event Assistance Program): up to 100,000 attendees, on request, at least two weeks before the event
Live events (deprecated)
Live events support up to 10,000 attendees by default, with a temporary increase to 20,000 until further notice. Up to 100,000 attendees can be planned through the Microsoft 365 Assistance Program.
Microsoft recommends transitioning to Town halls, as support for Live events will eventually end.
Cross-cutting limits
- Maximum duration: meetings, webinars and town halls have a 30-hour time limit.
- Breakout rooms: not supported in town halls; only available in meetings/webinars with fewer than 300 attendees.
- External presenters in town halls: up to 20.
Live human interpretation
Live human interpretation lets organizers assign professional interpreters to language pairs before the event. During the event, attendees pick their preferred language channel and use a volume slider to balance the original speaker's audio against the interpreted audio.
Where it is supported
Language interpretation is supported for regular scheduled meetings, channel meetings, meetings with up to 1,000 participants, and webinars.
Key technical points:
- Up to 16 language pairs per event, with one interpreter assigned per language direction.
- Recordings capture only the original audio — the interpreter's audio is not included in the recording.
- Live captions only follow the main speaker, not the interpreter.
- Interpretation must be configured before the event starts, by enabling the feature in meeting options and adding the interpreters as required attendees.
Where it is NOT supported
Live human interpretation is not available in:
- Town halls
- Live events
- Ad-hoc meetings ("Meet now") and 1:1 calls
- Meetings using Microsoft Teams Rooms with personal devices
- Teams Free meetings
- End-to-end encrypted (E2EE) meetings
- Breakout rooms (the main meeting can be interpreted, but interpretation stops when breakout rooms start)
If your event requires live human interpretation AND a very large audience (above ~1,000 attendees), Teams native interpretation will not fit. In that case, plan a webinar at the 1,000-attendee limit, or use an external interpretation platform (such as a third-party RSI service) alongside a Teams town hall.
Interpreter agent (Copilot) — AI alternative
Microsoft also offers an AI-powered "Interpreter agent" that requires a Microsoft 365 Copilot license. Unlike the human interpretation feature, the Interpreter agent is supported in meetings, webinars and town halls, making it currently the only built-in way to provide real-time spoken translation in a Teams town hall.
The Interpreter agent is an AI service, not a substitute for a professional human interpreter — quality, terminology accuracy, and handling of overlapping speech are limited compared with a trained interpreter.
Choosing the right event type
| If you need... | Best fit |
|---|---|
| Full two-way interaction up to 1,000 people | Standard meeting |
| Registration, branding, attendance reporting | Webinar |
| Live human interpretation | Standard meeting or webinar |
| 1,000–10,000 view-only attendees, no human interpretation | Town hall |
| 10,000–100,000 attendees | Town hall with Teams Premium + LEAP |
Official references
- Limits and specifications for Microsoft Teams
- Overview of meetings, webinars, and town halls
- Meetings, webinars, and town halls feature comparison
- Plan for Teams meetings
- Get started with town hall in Microsoft Teams
- Switch from Microsoft Teams live events to town halls
- Tips for setting up large meetings and events in Microsoft Teams
- Use language interpretation in Microsoft Teams meetings
- Interpreter in Microsoft Teams meetings and calls
- Manage Interpreter agent for your organization
Event Engine State API
Brainsonic Live is relying on an in-house application called Event Engine. For each digital event, an Event Engine instance is created.
This API allows third party applications to get information about an Event Engine instance configuration and state.
The access to this API may incur additional charges
To obtain an API key and secret get in touch with your Brainsonic Live representative
We assume that this third party application is split into a frontend application that is executed on client environment and a backend application that runs on a server.
This information is provided thanks to two requests :
getStateURLintends to be requested from a backend application. This returns the endpoint URL that frontend application will need to request.getStateallows the frontend application to request Event Engine instance state every 5s.

- The frontend application get the State URL from the backend application
- The backend application get the Event Engine instance state URL
- Carries a bearer token. JWT HS512 format,
- The token is signed with a secret (API key)
- Payload contains a service ID (
aud), a client ID (iss) and an expiration date (exp) - TTL range = 30s - 60s
- To be cached on backend for 15 minutes
- Every 5 seconds, the frontend application pull the Event Engine instance state
- Response is cached for 5 seconds
Exemple use case
- Frontend application request the State URL to backend application (request 1)
- If the backend application obtained the State URL more than 15 minutes ago then it needs to be requested again (request 2).
There is no need to maintain a state on the backend server. A 15 minutes cache on request 1 is enough. - Frontend application uses the State URL to pull Event Engine instance state every 5 seconds (request 3)
- Frontend application requests a new State URL to the backend application every 15 minutes.
get State URL
requete Method GET
requete Header Authorization: Bearer <JWT>
reponse Cache: no-cache
Success response
a json object holding the following properties
- stateUrl
stringURL that need to be requested by frontend application
response Statuses
- Success 200
- Unauthorized Status 401
- Error Status 400
Properties
The token carried by the request is a Json Web Token (JWT) encrypted with a shared secret. Secret is shared between Event Engine and the third party backend application
- alg: HS512
- iss: <your site/application ID>
- aud: <service ID>
- exp: 30s or 60s
get Sate
requete Method GET
response Cache 5s
response Status
Success response
a json object holding the following properties
- playerState
string:custom|prelive|live|postlive|replay|interruption
playerState values relates to the corresponding site states
- custom: the site displays a custom layout. A typical setup is a countdown as long as a video loop background
- prelive: on the site a "Live is about to start" waiting card or equivalent is visible
- live: the live player is loaded and visible
- postlive: the site displays a "Live has ended" message or equivalent
- replay: the replay is available
- interruption: the site displays an interruption "Live will resume soon" message or equivalent
- playerManifest
stringHLS URL
The manifest loaded by our live player. NB. the value can change from one request to the other. - countdown
objectCountdown properties- visible
boolean:true|false
When true, the countown is visible on our site above the player or waiting card
- end
unix timestamp: countdown end time
When reached the countown displays an end message - serverTime
unix timestampserver current time
You can adjust end on the client with respect to the local and server time difference
- visible
- Example of assets properties
Response statuses
- Success 200
- Unauthorized Status 401
- Error Status 400
Limitations
get State URL
- Hit/s = 1
- Maximum Hit/minute = 4
Embedded Player Customization
Event Engine can be customized with event-specific assets. In order to simplify integration workflow, especially for last minute assets delivery, the following settings are mandatory.
Different states

Layers composition

Expected material
The following list will help us integrate quickly and seamlessly your custom design to
- Event Engine Web interface, i.e., for embedded digital event,
- Event Engine State API,
- Preshow video/image slates
If you are using Figma please
- name the elements with unique label (i.e., myLabel-language-[ratio:169|916])
- group elements by language then ratio
- use the / character as folder/group prefix
- All 16:9 slates (prelive, postlive, interruption, custom)
- including foreground and background
-

- PNG format
- 1920x1080
- 960x540
- including foreground and background
- All 9:16 slates (prelive, postlive, interruption, custom)
- including foreground and background
-

- PNG format
- 1080x1920
- 540x960
- including foreground and background
- All 16:9 slates (prelive, postlive, interruption, custom)
- foreground only with transparent background (with bounding box)
-

- PNG format
- 1920x1080
- 960x540
- All 9:16 slates (prelive, postlive, interruption, custom)
- foreground only with transparent background (with bounding box)
-

- PNG format
- 1080x1920
- 540x960
- foreground only with transparent background (with bounding box)
- All 16:9 dynamic foreground
- foreground only with transparent background (with bounding box and without dynamic content like countdown)
-

- PNG format
- 1920x1080
- 960x540
- foreground only with transparent background (with bounding box and without dynamic content like countdown)
- All 9:16 dynamic foreground
- foreground only with transparent background (with bounding box and without dynamic content like countdown)
-

- PNG format
- 1080x1920
- 540x960
- foreground only with transparent background (with bounding box and without dynamic content like countdown)
- 16:9 Background
-

- PNG format
- 1920x1080
- 960x540
-
- 9:16 Background
-

- PNG format
- 1080x1920
- 540x960
-